
In Click, a logical page is composed of a Java class and a Velocity template, with these components being defined in page elements of the click.xml file.
<page path="search.htm" classname="com.mycorp.page.Search"/>The path attribute specifies the location of the page Velocity template, and the classname attribute specifies the page Java class name. If you use an alternative template engine such as Freemarker, the setup above is the same. Alternatively you can also configure Click to use JSP pages for rendering.
<page path="search.jsp" classname="com.mycorp.page.Search"/>
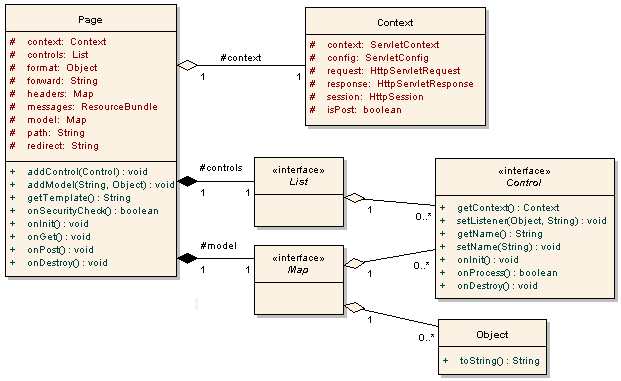
Figure 1. Page Class Diagram - created with Enterprise Architect courtesy Sparx Systems
The Page class provides a model attribute which is used to hold all the objects that are rendered in the page's Velocity template. The model may also contain Control objects, which provide user interface controls on the Page. Pages also have an associated Context object which references all the javax.servlet objects associated with the request. When programming in Click you use the Context object to access HttpServletRequest attributes, parameters and the HttpSession object.
Figure 2. GET Request Sequence Diagram - created with Enterprise Architect courtesy Sparx Systems
Stepping through this GET request sequence, a new Page instance is created and the attributes for the Page are set (context, format, headers, path). Next, request parameter values are bound to any matching public Page fields. Then the onSecurityCheck() handler is executed. This method can be used to ensure the user is authorized to access the page, and if necessary abort any further processing. The next method invoked is onInit(), this is where you place any post constructor initialization code. onInit() is the ideal place to create controls such as Forms, Fields and Tables. As illustrated by the diagram, after a Page's onInit() is called, each Control, available at that stage, will have their onInit() method called. The next step is the processing of the Page's controls. The ClickSerlvet gets the list of Controls from the page and then iterates through the list calling onProcess(). If any of the Control's onProcess() methods return false, processing of subsequent controls and the Page's onGet() method is aborted. If everything is executing normally the Page's onGet() method is now called. The next step is rendering the page template to generate the displayed HTML. The ClickServlet gets the model (Map) from the Page then adds the following objects to the model:
Figure 3. Page Execution Activity Diagram - created with Enterprise Architect courtesy Sparx Systems
http://localhost:8080/mycorp/customer-details.htm?customerId=7203This request is automatically handled by our CustomerDetails page:
package com.mycorp.page;

public class CustomerDetails extends Page {

    public Integer customerId;

}
After the CustomerDetails page has been created the "customerId" request parameter value "7023" will be converted into an Integer and assigned to the public page field customerId. Another feature of Click is that any public Page fields are automatically added to the page's model before it is rendered. This will make these values available in the page template for display. In our example the public customerId field will be added to the Page model and will be available for rendering in the page template: Our customer-details.htm page template contains:
<html>
<body>

  Customer ID: $customerId

</body>
</html>
After processing the request our page would be rendered as:
| Customer ID: 7203 |
public class CustomTypeConverter extends RequestTypeConverter {

    private CustomerService customerService = new CustomerService();

    /**
     * @see RequestTypeConverter#convertValue(Object, Class)
     */
    protected Object convertValue(Object value, Class toType) {
        if (toType == Customer.class) {
            return customerService.getCustomerForId(value);

        } else {
            return super.convertValue(value, toType);
        }
    }
}
This type converter would handle the following request:
http://localhost:8080/mycorp/customer-details.htm?customer=7203This request will load the customer object from the database using "7203" as the customer id value. The ClickServlet would then assign this customer object to the matching page field:
package com.mycorp.page;

public class CustomerDetails extends Page {

    public Customer customer;

}
To make your custom type converter available you will need to subclass ClickServlet and override the getTypeConverter() method. For example:
public class CustomClickServlet extends ClickServlet {

    /**
     * @see ClickServlet#getTypeConverter()
     */
    protected TypeConverter getTypeConverter() {
        if (typeConverter == null) {
            typeConverter = new CustomTypeConverter();
        }
        return typeConverter;
    }
}
public class Secure extends Page {

    /**
     * @see Page#onSecurityCheck()
     */
    public boolean onSecurityCheck() {

        if (getContext().hasSession()) {
            return true;

        } else {
            setRedirect(LoginPage.class);
            return false;
        }
    }
}
public class Secure extends Page {

    /**
     * @see Page#onSecurityCheck()
     */
    public boolean onSecurityCheck() {

        if (getContext().getRequest().getRemoteUser() != null) {
            return true;

        } else {
            setRedirect(LoginPage.class);
            return false;
        }
    }
}
public class AdminPage extends Page {

    /**
     * @see Page#onSecurityCheck()
     */
    public boolean onSecurityCheck() {

        if (getContext().getRequest().isUserInRole("admin")) {
            return true;

        } else {
            setRedirect(LoginPage.class);
            return false;
        }
    }
}
public class Logout extends Page {

    /**
     * @see Page#onInit()
     */
    public void onInit() {
        getContext().getSession().invalidate();
    }
}
/**
 * @see Page#onPost()
 */
public void onPost() {
   // Process form post
   ..

   setForward("index.htm");
}
This will invoke a new Page class instance mapped to the path index.htm. Please note when a request is forwarded to another Page, the controls on the second page will not be processed. This prevents confusion and bugs, like a form on the second page trying to process a POST request from the first page.
public boolean onViewClick() {
   Long id = viewLink.getValueLong();
   Customer customer = CustomerDAO.findByPK(id);

   // Set the customer object as a request parameter
   getContext().setRequestAttribute("customer", customer);
   setForward("view-customer.htm");

   return false;
}
The snippet above forwards to the page template view-customer.htm:
<html>
 <head>
   <title>Customer Details</title>
 </head>
 <body>
   <h1>Customer Details</h1>
   <pre>
     Full Name: $customer.fullName
     Email:     $customer.email
     Telephone: $customer.telephone
    </pre>
  </body>
</html>
Request attributes are automatically added to the Velocity Context object so are
available in the page template.
public boolean onEditClick() {
   Long id = viewLink.getValueLong();
   Customer customer = CustomerDAO.findByPK(id);

   // Create a new EditPage instance based on the specified path
   EditPage editPage = (EditPage) getContext().createPage("/edit-customer.htm");
   editPage.setCustomer(customer);
   setForward(editPage);

   return false;
}
When creating a page with the createPage() method ensure you prefix the page path with the "/" character. You can also specify the target page using its class as long as the Page has a unique path. (Although uncommon it is possible to map more than one path to the same class. In these cases invoking Context.createPage will throw an exception, because Click will not be able to determine which path to use). Using this technique the above code becomes:
public boolean onEditClick() {
   Long id = viewLink.getValueLong();
   Customer customer = CustomerDAO.findByPK(id);

   // Create a new EditPage instance based on its class
   EditPage editPage = (EditPage) getContext().createPage(EditPage.class);
   editPage.setCustomer(customer);
   setForward(editPage);

   return false;
}
This Page forwarding technique is best practice as it provides you with compile time safety and alleviates you from having to specify page paths in your code. Please always use the Context createPage() methods to allow Click to inject Page dependencies.
public boolean onViewClick() {
   Long id = viewLink.getValueLong();
   Customer customer = CustomerDAO.findByPK(id);

   addModel("customer", customer);

   // Set the Page's path to a new value
   setPath("view-customer.htm");

   return false;
}
Note how the customer object is passed through to the template in the Page model. This approach of using the Page model is not available when you forward to another Page, as the first Page object is "destroyed" before the second Page object is created and any model values would be lost.
public boolean onLogoutClick() {
   setRedirect("/logout.htm");
   return false;
}
If the redirect location begins with a "/" character the redirect location will be prefixed with the web applications context path. For example if an application is deployed to the context "mycorp" calling setRedirect() will redirect the request to: "/mycorp/customer/details.htm" You can also obtain the redirect path via the target Page's class. For example:
public boolean onLogoutClick() {
   String path = getContext().getPagePath(Logout.class);
   setRedirect(path);
   return false;
}
Note when using this redirect method, the target Page class must have a unique path. A short hand way of redirecting is to simply specify the target Page class in the redirect method. For example:
public boolean onLogoutClick() {
   setRedirect(Logout.class);
   return false;
}
public class Payment extends Page {
   ..

   public boolean onOkClick() {
      if (form.isValid()) {
         // Process payment
         ..

         // Get transaction id
         Long transId = OrderDAO.purchase(order);

         setRedirect("trans-complete.htm?transId=" + transId);

         return false;
      }

      return true;
   }
}
The Page class for the trans-complete.htm page can then get the transaction id through the request parameter "transId":
public class TransComplete extends Page {

   /**
    * @see Page#onInit()
    */
   public void onInit() {
      String transId = getContext().getRequest().getParameter("transId");

      if (transId != null) {

         // Get order details
         Order order = OrderDAO.findOrderByPK(new Long(transId));
         if (order != null) {
            addModel("order", order);
         }
      }
   }
}
public class BorderedPage extends Page {

    /**
     * @see Page#getTemplate()
     */
    public String getTemplate() {
        return "/border.htm";
    }
}
The BorderedPage template border.htm:
 <html>
   <head>
     <title>$title</title>
     <link rel="stylesheet" type="text/css" href="style.css" title="Style"/>
   </head>
   <body>

     <h2 class="title">$title</h2>

     #parse($path)

   </body>
 </html>
Other pages insert their content into this template using the Velocity
#parse directive,
passing it their contents pages path.
The $path value is automatically added to
the VelocityContext by the ClickServlet.
An example bordered Home page is provided below:
<page path="home.htm" classname="Home"/>
public class Home extends BorderedPage {

     public String title = "Home";

}
The Home page's content home.htm:
<b>Welcome</b> to Home page your starting point for the application.When a request is made for the Home page (home.htm) Velocity will merge the border.htm page and home.htm page together returning:
 <html>
   <head>
     <title>Home</title>
     <link rel="stylesheet" type="text/css" href="style.css" title="Style"/>
   </head>
   <body>

     <h2 class="title">Home</h2>

     <b>Welcome</b> to Home page your application starting point.

   </body>
 </html>
Which may be rendered as:
HomeWelcome to Home page your application starting point. |
    /**
     * Render the Java source file as "text/plain".
     *
     * @see Page#onGet()
     */
    public void onGet() {
        String filename = ..

        HttpServletResponse response = getContext().getResponse();

        response.setContentType("text/plain");
        response.setHeader("Pragma", "no-cache");

        ServletContext context = getContext().getServletContext();

        InputStream inputStream = null;
        try {
            inputStream = context.getResourceAsStream(filename);

            PrintWriter writer = response.getWriter();

            BufferedReader reader =
                new BufferedReader(new InputStreamReader(inputStream));

            String line = reader.readLine();

            while (line != null) {
                writer.println(line);
                line = reader.readLine();
            }

            setPath(null);

        } catch (IOException ioe) {
            ioe.printStackTrace();

        } finally {
            ClickUtils.close(inputStream);
        }
    }
package com.mycorp.page;

import java.io.Serializable;

import net.sf.click.Page;

public class SearchPage extends Page implements Serializable {

    private static final long serialVersionUID = 1L;

    public SearchPage() {
        setStateful(true);
        ..
    }
}
Stateful page instances are stored in the user's HttpSession using the pages class name as the key. In the example above the page would be stored in the users session using the class name: com.mycorp.page.SearchPage
<page path="click/error.htm" classname="net.sf.click.util.ErrorPage"/>To register an alternative error handler you must subclass ErrorPage and define your page using the path "click/error.htm". For example:
<page path="click/error.htm" classname="com.mycorp.page.ErrorPage"/>When the ClickSevlet starts up it checks to see whether the error.htm template exists in the click web sub directory. If it cannot find the page the ClickServlet will automatically deploy one. You can tailor the click/error.htm template to suite you own tastes, and the ClickServlet will not overwrite it. The default error template will display extensive debug information when the application is in development or debug mode. Example error page displays include:
<page path="click/not-found.htm" classname="net.sf.click.Page"/>You can override the default configuration and specify your own class, but you cannot change the path. When the ClickSevlet starts up it checks to see whether the not-found.htm template exists in the click web sub directory. If it cannot find the page the ClickServlet will automatically deploy one. You can tailor the click/not-found.htm template to suite you own needs. This page template has access to the usual Click objects.
<h1> $messages.title </h1>
This messages map is loaded from the page class property bundle. For example
if you had a page class com.mycorp.page.CustomerList you could have
an associated property file containing the pages localized messages:
/com/mycorp/page/CustomerList.propertiesYou can also defined a application global page messages properties file:
/click-page.propertiesMessages defined in this file will be available to all pages throughout your application. Note messages defined in your page class properties file will override any messages defined in the application global page properties file. Page messages can also be used to override Control messages, see the Controls Message Properties topic for more details.